RAW photos hold a lot of detail, but straight out of the camera, they look flat, dull, and lifeless. Why? Because RAW files preserve all the sensor data without in-camera processing such as contrast, sharpening, or colour correction. That’s a good thing—it gives you control. But it also means you must process RAW photos to make them look their best.
This short guide will show you how to simplify your workflow and bring your images to life, without getting lost in sliders. Whether you’re short on time or want a reliable processing method, this approach helps you extract the full potential from your RAW files.
TL;DR: Process Raw Photos Easily (A Four-Step Workflow)
- Adjusting highlights, shadows, whites and blacks to reveal hidden detail.
- Tweak exposure to achieve natural brightness (i.e., not too dull or washed-out).
- Set white and black points near their extremes (without clipping) to maximise contrast and dynamic range.
- Add final touches (e.g., colour & lens correction, local adjustments, film grain, etc.) to make your photo look complete and engaging.
Why It’s Hard to Process RAW Photos
Learning how to process RAW photos can feel overwhelming. With endless tutorials, trendy presets, and clashing opinions about what makes a “good” photo, it’s easy to get stuck or over-edit. One big challenge? There’s no clear benchmark for what your final image should look like, because it involves two stages: processing to improve exposure, tone, and clarity, and editing to shape mood and style.
✅ Tip: Use photos from photographers you admire as a reference point. Their style can help guide your creative decisions and keep your edits purposeful.
With this challenge in mind, here’s a simple, reliable workflow to help you process RAW photos effectively in Lightroom or Adobe Camera Raw.
Process RAW Photos (Four-Step Workflow)
Follow these four simple steps to process RAW photos in Lightroom or Adobe Camera Raw into striking, well-balanced images:
- Adjust Basic Settings – Reveals hidden detail and definition.
- Tweak Exposure – Achieves natural brightness.
- Set White & Black Points – Maximises contrast and clarity.
- Add Final Touches – Makes photos look complete and engaging.
✨ Optional: Remove Colour – Begin by temporarily desaturating your image—this helps you focus on light, shadow, and composition without the distraction of colour.
I use this method as an experienced photographer with limited time (i.e., I’m also a psychology professor with a full teaching schedule!). You can adapt it to your preferences, but these steps always work for me.
Step 1: Adjust Basic Settings to Reveal Hidden Detail and Definition
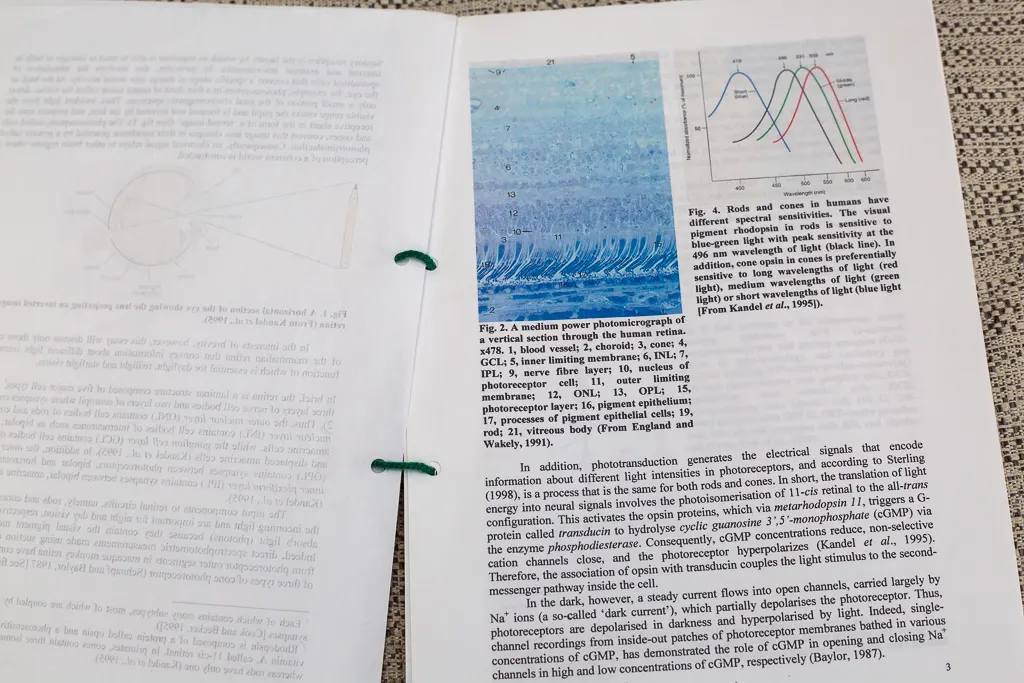
Firstly, adjust basic settings using the suggested values below to reveal hidden detail and definition in both bright and dark areas:
| Adjustment | Suggested Value | Why It Helps |
|---|---|---|
| 🌤️ Highlights | –35 | Recovers detail in bright areas |
| 🌑 Shadows | +40 | Brings out details in the dark |
| ⚪ Whites | +30 | Boosts clarity & crispness |
| ⚫ Blacks | –15 | Enhances depth & contrast |
| 📈 Tone Curve | Medium Contrast | Expands bright & dark areas |
This step builds a solid foundation to process RAW photos effectively, giving you more flexibility in later edits.
✅ Tip: Removing colour from your RAW photo helps you judge tones and structures more clearly, without colour biasing your processing decisions (see Figure 1).

Step 2: Tweak Exposure to Achieve Natural Brightness
Then, turn your attention to the histogram.
- Tweak exposure until your midtones sit roughly in the centre, achieving natural brightness.
- Aim for a centralised histogram, not skewed left or right. Of course, if your image should be moody or high key, it’s OK for the histogram to lean one way.
This step ensures your RAW photos won’t look too dull or washed out (see Figure 2).
📌 Remember, the histogram is your best friend for checking overall exposure.

Step 3: Set White & Black Points to Maximise Contrast and Clarity
After that, maximise contrast and clarity by pushing white and black points near their extremes (see Figure 3). Thus:
- Set Whites so the brightest areas approach 255, without clipping.
- Set Blacks so the darkest areas approach 0, again without clipping.
But don’t obsess—most real-world scenes contain a mix of tones, not absolute black or white. For instance, clouds and shadows often fall short of the extremes.
Also, if you removed colour earlier, reset saturation to zero to bring it back.
⚠️ Important: Let specular highlights (e.g., reflections on water, chrome, or glass) be pure white. These bright spots should clip naturally—trying to recover detail here will look unnatural.

Step 4: Add Final Touches to Make Your Photos Look Complete and Engaging
Lastly, add final touches or creative adjustments to turn a technically correct photo into a visually compelling one (see Figure 4). Such as:
- 🎨 Correct white balance to ensure your colours look natural and true-to-life.
- 📐 Fix perspective to straighten lines and horizons for a more natural look.
- 🎯 Make local adjustments (like dodge and burn) to lighten or darken specific areas, guiding the viewer’s eye.
- 🖼️ Apply sharpening, film grain, or vignettes to enhance mood and give your image a finished look.
When you’re happy with the result, export your image as a JPEG or TIFF to share or print.
📌 Keep your edits subtle and purposeful—this workflow helps you make the most of every RAW file.

Wrap-up: Process RAW Photos Without Overthinking
The beauty of this method is its simplicity.
Overall, you don’t need to spend hours on every image. Use this streamlined workflow to process and edit RAW photos faster, with excellent results—then get back to shooting!
Final Thoughts
Processing RAW photos is personal. There’s no single “correct” edit. Use this workflow to stay focused, avoid analysis paralysis, and spend more time shooting great photos.
Explore More
If this post helped you process RAW photos more confidently, why not dive deeper?
Learn more. Worry less. Shoot better.
Recommended Reading
Looking to improve not just how you edit, but how you see the world through your lens?
How to Use Composition and Empathy to Take Better Photos. A science-backed guide showing how empathy, attention, and thoughtful composition can elevate your photography skills.